I
will cover easy postures that can be incorporated and aid from the previous
blog. These poses will help with flexibility and are helpful stretches to
include in your daily routine.
Please
be aware of your body’s needs and current limitation to avoid any
injuries. Keep in mind any discomfort
and always remember to breathe through these sensations because dexterity is on
its way.
Breathing
sequences are deep inhale and exhale, which are considered as one set of
breath.
Materials:
Wall and Chair
1)
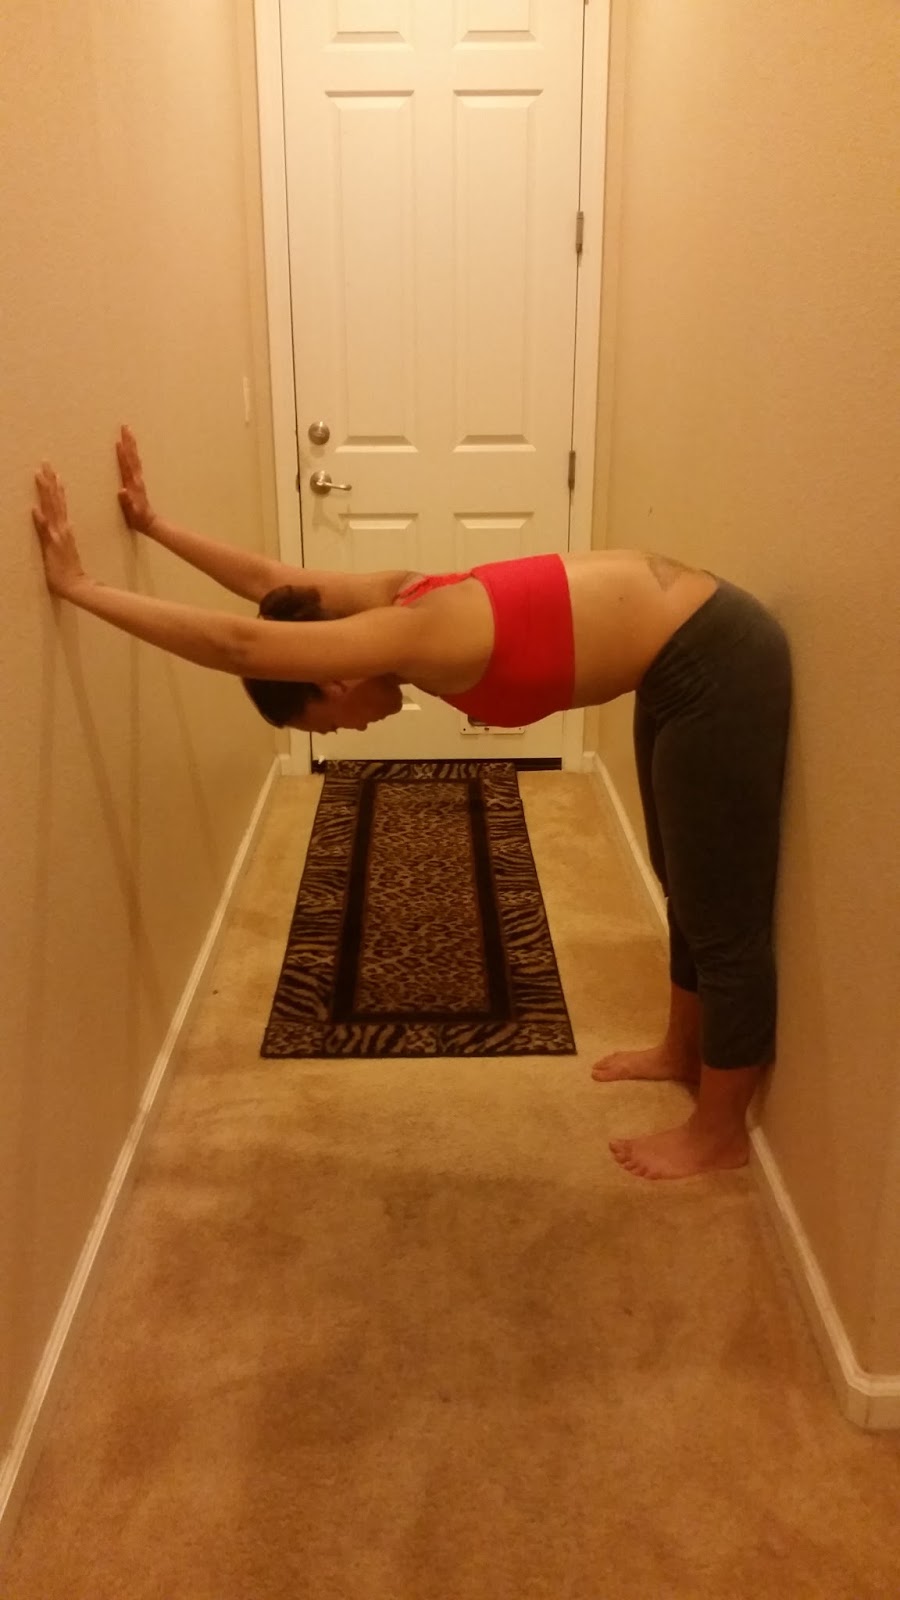
CAT & COW POSE
Position: Stand facing the
wall in a plank position. Hands are pressed on the wall and fingers are spread
apart.
Alignment: Hands are
shoulder distance apart and knuckles pressed to the wall. Eye of the elbow
facing each other. Feet are hip width apart. Shoulders are away from ears.
Effort: Shoulders and
eyes of the elbows stay firm. Engage leg by pulling your knee cap up to your
thighs. Dome upper back by pushing the wall away and shoulders rolling in, suck
stomach in and gaze at bellybutton. Then
stick butt out and pull heart forward, again while keeping hands straight and
sucking the stomach in.
Benefit: Stretches the
front torso, upper back, neck and lower back.
Breath: 7 Deep inhales for Cat pose into 7 deep
exhales for cow pose.
2) HIGH TO LOW PLANK
/ CHATURANGA
Position: Begin with elbow
squeezing your side then bring forearms up to a right angle and palms facing
forward. Now step toward the wall and press hands to the wall. Keep the hands
planted on the wall with the elbow bent
and step feet back about a foot until the arms are straight.
Alignment: Hands are below
armpit at 90 degree or right angle. Feet together, gaze forward and shoulder
rolled back.
Effort: press knuckle on
the wall and bend elbow at right angle. Shoulders are rolled back and stay
back. Core and legs are tightened or engaged. Elbows are always hugging the
side of the body.
Benefit: Strengthens
shoulders, core, and arms. Improves posture.
Breath: 7 sets of breath
3) SHOULDER STRETCH
Position: Imagine hugging
the wall, hands are wide apart and cheeks are pressed on the wall. Palms
against the wall.
Alignment: Your body looks
like a capital T. Feet together.
Effort: Begin on your right side turn, place left hand to your side then slowly turn your entire
body to 90 degree or right angle. Then bring your body closer to the wall or at
any point where your range of motion becomes limited and stay at that point.
Listen to your body; it knows best.
Benefit: Stretches
shoulders, hips and upper back.
Breath: 7 sets of breath
4) SIDE STRETCH
Position: Right side,
stand near a wall arm distance apart.
Raise left hand up toward the ceiling with palms facing the wall. Feet
are in front of another. Arm that is on the wall is tightened or engaged.
Alignment: Feet stacked in
front of one another. Hand that is pressing the wall and the feet is on top,
shoulders height. Back straight, shoulders are rolled back. Be as relaxed as
possible.
Effort: This is a whole body movement stretch-- Right side is continuously in motion. Start by
pulling your hips away from the wall; as you keep pulling, your right hand is
aiming to reach the wall by your left side.
For more of a stretch, slowly and gently bend the left elbow.
Benefit: Side, arm and hip stretch.
Breath: 7 sets of breath
5) LIZARD /STANDING
WALL TWIST
Position: Place a chair
next to a wall and face the chair. Now place your side of your choosing against
the wall, place hands on side palms pressed on hip. Place your foot closest to
the wall on the chair and lean the entire leg and hip on the wall. Now slowly
and gently turn your body towards the wall while keeping the bottom foot as it
is. Avoid dropping the hips down by keeping hips on the same level. Then place
your palms on the wall wider than shoulders for stability.
Repeat
on the opposite side.
Alignment: Sides of your
choosing if against the wall. Hips are square by leveling the hips. Whole front
body is facing the wall and palms are pressed on the wall for balance.
Effort: It’s a twist
action. Be kind and gentle with yourself.
Benefit: Stretches
shoulders, torso and hips. Strengthens the legs.
Breath: 7 sets of breath
The divine in me honors the divine in you. I recognize my true essence in every soul I meet. I am you, you are me, and we are one.
<3 Namaste <3